Chapter 10, Page 1

Greetings again from our homes! How are you all doing? We hope you’re doing great.

It feels like just yesterday we began this journey with you, creating blog posts that detailed our every step. Now, we’re drawing close to the end. Indeed, we have run the good race and fought the good fight. If you’ve been following thus far, why not drop a comment or even a “hi”? We’ll be looking out 😀

Well, it’s that time of the semester when final projects are due and whew! What a ride it was been. This team has been amazing to work with, and I’ve (Tamisha) enjoyed every last second of it. Without further ado, here are our final deliverables! We hope you’ll see how these designs have grown over the course of the past couple of weeks.

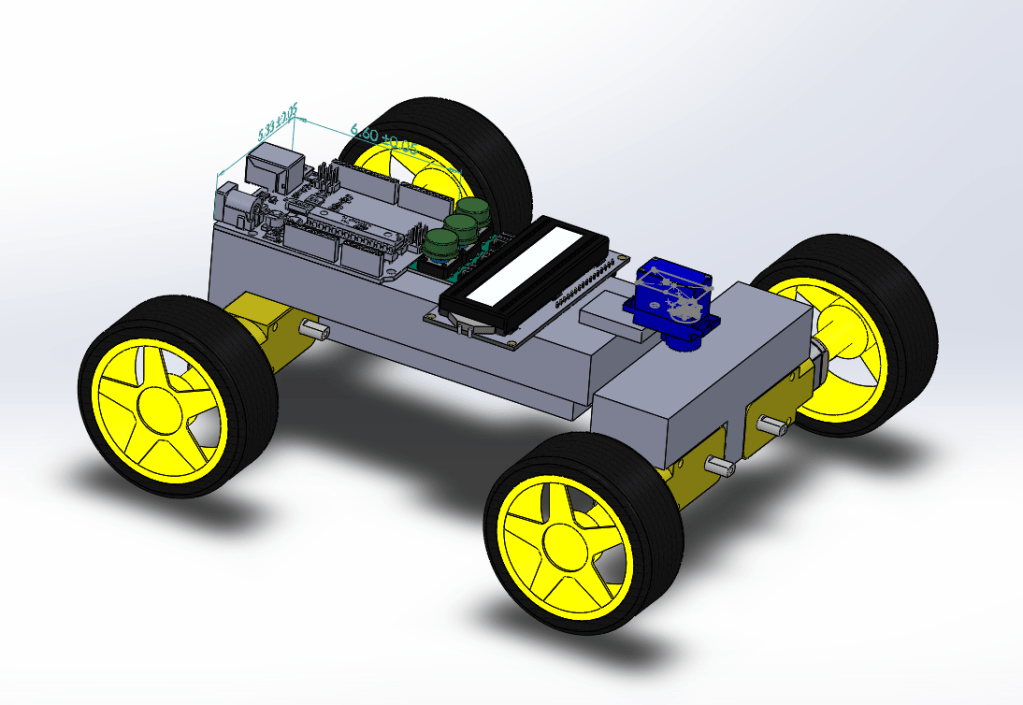
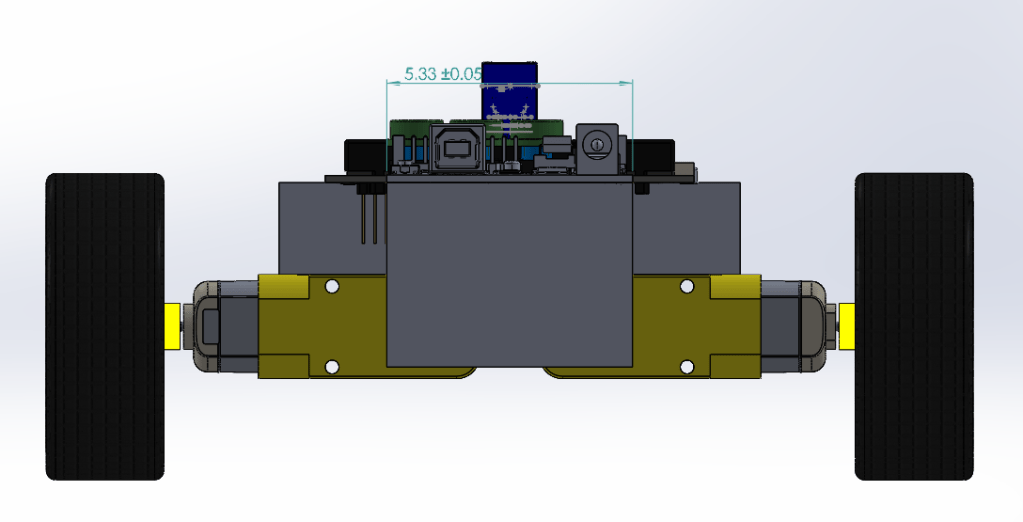
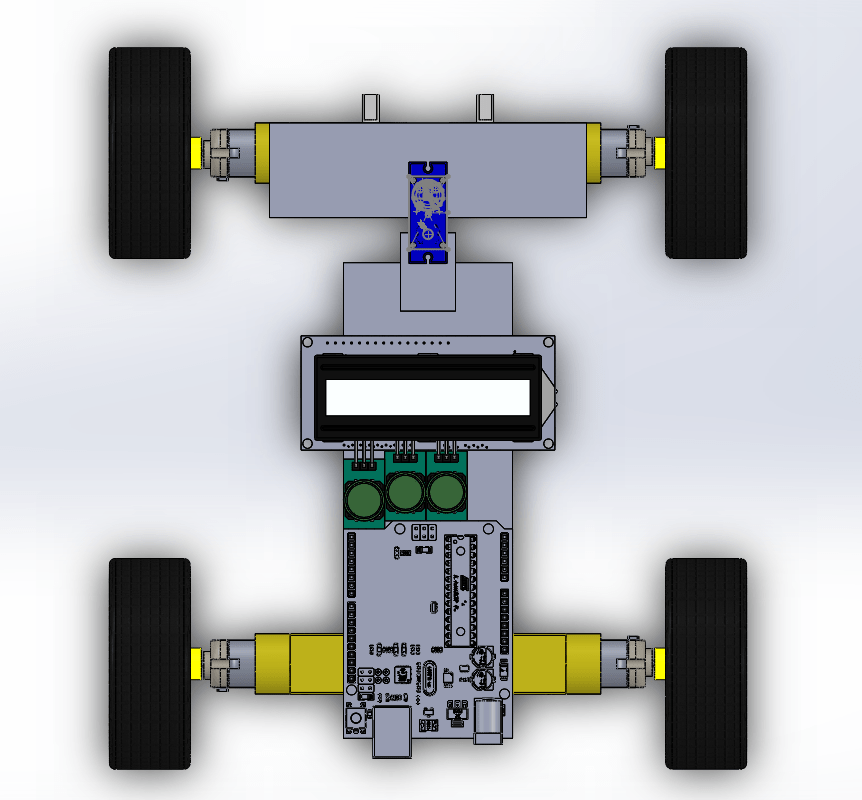
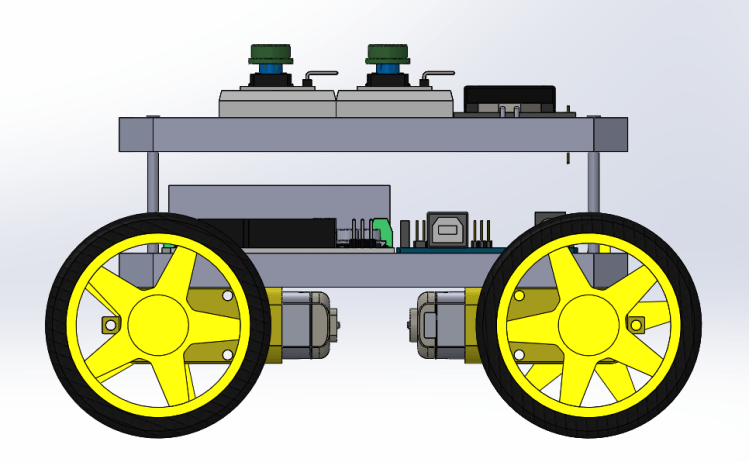
The final CAD prototype was shown in the previous article; however, we will put it here as well to save you the hassle of having to go back. Some comments we had about the initial prototype and this prototype shown below are discussed in the previous posts and so we would encourage you to check them out if you haven’t!

Fig 1: An image of the isometric view of our final prototype.

Teaching Manual

The whole concept of the teaching manual was built on having an interactive picture book that was colorful and easy to read. As such, we used the template of an architecture look book to get the easy to read fonts and ample space for our images. This is what we presented to our users and community partner Benedict.

The feedback from the previous assignment (or, lack thereof, given that people didn’t realize the word document was our prototype) allowed us to create something that stood out a bit more and was more recognizable as a picture book or as a teaching manual. This was the most important thing.


We presented these things (teaching manual + CAD model) to our users: a 14 year old male and a 12 year old female. Highlights of their feedback are listed below.

  1. A suggestion to make coding the robot more interactive and less “copy-and-paste”
  2. Some steps were unclear (this is because we couldn’t actually build the robot and had to rely on CAD assembly files to help relay our message across)
  3. A suggestion to add a voiceover that talks the user through how to build and code the robot

While these were amazing suggestions, the only feedback we could work on due to proximity and material constraints was #1, which was vastly improved in our next teaching manual as it explained the code line by line.

An image of a snippet of code being explained.

We also presented the same set of deliverables to our community partner, Benedict. Please find below a summary of his feedback.

  1. Explaining the code section by section before putting it all together so the user feels part of the process
  2. Making the headings of the manual clear and easy to understand so that the user understands when the transitions are

These feedback points were quite helpful and we implemented them. After doing so, we realized that, indeed, it improved the understandability of our manual! This is one major thing we have learned from this class, that taking feedback is a good thing if you want to make sure that you produce your best.

These things can be found in a OneDrive folder (in case you want to see a close-up of the deliverables). We might include it in a next post if someone asks!

All too soon, we’ve come to the end of a lovely journey (though, there might be some more posts in the future just to see how we’re all doing 😉). We hope you’ve learned as much as we have. Until next time!

Chapter 9, Page 1

Hi, again, and welcome to our blog.

In this feature, we’re going to discuss some more technical details such as how we prototyped the robot and solution manual, as well as the feedback we received from our users, community partner, faculty, and even fellow students. We hope you enjoy this read.

CAD Models

Fig 1: Isometric view of our initial prototype.
Fig 2: Back view of our initial prototype.
Fig 3: Top view of our initial prototype.

The images above represent the initial CAD prototype we had for the robot. However, this was problematic in many ways. First of all, the long shape of the model would cause there to be an awkward steering mechanism. In addition, it was just too narrow and didn’t provide us with all the features we knew we would need. These considerations were taken into designing the final CAD model as shown below.

Fig 4: Top view of the final CAD model.
Fig 5: Isometric view of the final CAD model.
Fig 6: Side view of the final CAD model

As seen above, the shape of the robot evolved from being a narrow rectangle to being a square shape more similar to actual cars. This made the steering much simpler, and the layout of the push buttons, breadboards, and LCD screen on top make it easier to utilize the full functionality of the robot. Feedback: When we presented this to our users, one of them expressed interest in having a safety covering for the robot to prevent it from collisions and damage, which is something we didn’t think about but definitely something interesting to consider in the next stages.

Low-Fi Prototype

The images above are of the low-fi prototype we built using readily available materials at home. Majority of the feedback we received (from faculty and students alike) is that it was well-built. However, we knew from building it that two push buttons would not be enough to implement full functionality (which is why you saw 4 push buttons on the final CAD model design). One main thing we got from this design, though, was the concept of encapsulation or hiding the internal circuitry of the robot. This is why the final CAD model has two slabs that are seemingly protecting the boards underneath.

Teaching Manual

The low-fi prototype of our teaching manual was a word document with pictures and instructions in it. However, we realized that the meaning of this was lost on our users, fellow students, and esteemed faculty. Even though we had included the document and labelled it as such, we noticed that it wasn’t clear whether or not it was the prototype.

Tests

With respect to performing tests on the low-fi prototype, we didn’t do much except take note of a few design elements we would include in the final design. This is because there was no good way to really test if the robot was working. We had, however, started working on the code and so this was read through over and over again, as well as edited, to produce code that would give the user the best learning experience (discussed in our next post).

‘Til we meet again next time.

Stay safe.

Chapter 8, Page 1

Is that a baby in the background?

Said every person on a Zoom call ever 🙂

Greetings from our homes and personal work spaces! How are you all doing? Once again, we hope you’re staying safe and healthy.

Today, we’ll be taking you through our shift to a virtual work-space as well as how we planned on continuing the project even though we were hit severely by the COVID-19 pandemic (as almost all of you reading were).

If this was another normal season in our lives as students, we would have been gathering our materials and getting ready to build a robot for our project. Alas, as life would have it, we went home after our school experienced a seemingly indefinite closure. Initially, this wasn’t too much of a problem because we could always order the electronics parts that we needed and assemble the robot in someone’s home. Then, another wave hit — some areas in Ghana were placed on a lockdown. So, we couldn’t even order the electronics parts. It was a little discouraging but, after all, everything ends up working for our good! Keep reading…

Prior to the 2019-nCoV debacle, we had created a workspace on Slack to keep up with each other even in the event that someone didn’t have access to WhatsApp. A majority of our meetings were already happening virtually and, so, the virus didn’t deal a huge blow to the quality and frequency of our meetings. However, our initial plans were shattered as everything had to be put on hold. We weren’t sure what was going to happen next.

You see, the Phase 3 process of the CCB Design Process is very hands-on and interactive. The first aspect deals with building a prototype, like a minimum viable product, that has the essential features of your final product without the bells and whistles. Then, you test this prototype and use feedback to translate it from the realm of a prototype to the realm of a finished product. We’re going to add some pictures of our initial prototypes (please, don’t laugh). In a later post, we’ll show you the final product and the journey of feedback it took to get there.

Isn’t she cute?
An angled view of our initial CAD model. Shoutout to Terry, he did an awesome job!

Even though we weren’t close to each other physically, WhatsApp and Slack made it possible for us to check in on each other and make sure that we were all doing the work.


Usually, to divide work among team members, we used a random process. However, for some more recent assignments, what happened was that the rubric would inform the sections of the work. Then, these sections were explained in detail and put in the WhatsApp group. The first person to see the message was the first person to choose, and this made assigning the work easier. People chose what they were comfortable with and did an excellent job with the sections that they were assigned.


Because we couldn’t meet in person, we made sure that we were very active on the WhatsApp page. This is one of the major changes that we made to suit the changing nature of schooling online. We also made sure that we completed our work at least a day before. Working from home isn’t easy, and the last thing we wanted was to have a half-assed submission. Hence, everyone respected each other’s time and made sure to do their work on time.

That’s all for now, but check back for updates! Until next time, as we always say, stay safe & stay home.

Chapter 7, Page 1

So, today… who can guess what we’re about to do? It’s kind of boring, it’s not too long, but we can assure you that you’ll be glad to read it :).

We’re discussing our Bill! Of! Materials! Yay! Can we get a round of applause?

A bill of materials is a comprehensive list of parts and items that are needed to create a product. In this post, we’ll be looking at the materials we chose for our project and the various subsystems. We’ll show you our initial BOM before we decided on a final idea, and then the updated BOM after we selected our final ideas. Shall we begin?

BFS (Before Final Selection)

This was our initial Bill of Materials list. Yes, we know it’s very short and not pretty. But that’s what we had at the time.

At the time we made this Bill of Materials, we didn’t know what we were doing to do. All we knew was that we were going to use an Arduino microcontroller. Admittedly, it looks a little sad. However, it paints a general picture of what was going through our minds. Don’t worry, our final Bill of Materials list is much more detailed/comprehensive.

AFS (After Final Selection)

This is our final Bill of Materials list. It’s much more detailed 🙂

Most of these items are justifiable because they are typically used in existing robotics systems.

PLA, Polylactic Acid, is a bioplastic that is commonly used in 3D printing. We chose this polymer because it is biodegradable and does not adversely harm the environment. It is also versatile and can be applied in many different ways. However, we also took into consideration the fact that not every person might have access to a 3D printer. Hence, the user can replace the PLA slab with wood or cardboard or any other block-like material they have on hand.

And, that’s it! We’re done! (See, we told you it wouldn’t take long). If you have any questions, please leave them below and we’ll be happy to answer! ‘Till next time!

Chapter 6, Page 1

Hello lovely people! Good morning, good afternoon, good evening! Wherever you are, we hope you’re doing fantastic and staying safe!

First of all, we’d like to apologize for being so M.I.A.! School caught up with us but we’re back and ready to guide you through the rest of our journey through this course. Last time, we took you through our brainstorming process and some of the ideas that we came up with. Now, we’re going to let you know how we narrowed down our (extremely long) list to 4 ideas, and then how we selected the final ideas per subsystem.

TL;DR

Subsystem 1: The Robot

There were a lot of ideas that fell under this subsystem and, honestly, we were at a loss at to what to choose. All of them seemed like good ideas, and we were interested to implement them all. However, we had to make a decision. We narrowed down this list to 4 ideas mostly based on feasibility and time. The five ideas that made it to the next round are listed below (the winner is in bold):

  1. A robot that plots coordinates and moves to those coordinates to teach the students a little about coordinate geometry
  2. An obstacle avoidance robot
  3. A robot that indicates temperature on a physical scale
  4. A robot that indicates light intensity on a physical scale

We chose the idea in bold because it does something that makes the work more valuable. It teaches the user a concept that they can apply even in their schoolwork. In addition, the other three ideas need sensors, and obtaining sensors might be expensive or difficult.

The design requirements and selection criteria are included below in the form of a Pugh chart. A Pugh chart is essentially a table that helps you evaluate your ideas based on the design requirements you created earlier in the design cycle.

An image showing a Pugh chart for our ideas within the robot subsystem.

Subsystem 2: The Teaching Medium Subsystem

The five ideas that made it to the next round are listed below (the winner is in bold):

  1. Writing tutorials on flash cards that could be used to reinforce information
  2. Creating a picture manual with as little text as possible
  3. Creating animations of the robot assembly
  4. Sharing content and tutorials via a YouTube channel

We chose the idea in bold because it seems like a fun idea to do (not to mention it was the winner of the Pugh chart!). In addition, the major factors we considered were time, simplicity, and cost. We realized that when scaling, the other ideas might be too complex to create for a large number of tutorials.

An image showing a Pugh chart for our ideas within the teaching medium subsystem.

Chapter 5, Page 1

#Phase2Results

Hi everyone! Long time no see. We hope you’re doing well, staying safe, and not touching your face. What’s it like working from home slash schooling from home?

We’ve been very good, thank you! Moving school online has been… interesting, to say the least, but we’re moving forward and not turning back.

In this edition, we’ll be talking about our brainstorming and idea generation processing (aka, Phase 2 of the CCB Design Cycle — if you got that right then congrats! It means you’ve been reading the workbook. We’re glad). For this phase, we focused on generating as many ideas as we possibly could for our different subsystems. To achieve this, we used different brainstorming methods to come up with the required number.

Majority of our brainstorming was done in class when we had a guest lecture by David Hutchful (👏🏾) on creativity and, essentially, how to unlock our inner child. These are the main methods we used that proved to be super useful. We’ll include some links so you can learn more about them:

  • Brain Netting (online brainstorming – see a little example here)
  • Collaborative Brain Writing (contributing to the idea over a period of time – read about a different version here)
  • Round Robin (everyone took a turn to share – find some more details here)
  • The ‘What if’ method where we asked ourselves various “what if” questions to challenge our perceptions on existing ideas

As you can see, it was a fun session! We came up with a lot of crazy useful ideas that allows us to really think outside the box.

Cue a slideshow of some crazy ideas we thought about.

In our next update, we’ll let you know how the selection process went! Until next time, stay safe and stay at home!

Photo by Jan Tinneberg on Unsplash

Chapter 4, Page 1

Week number: 7

Greetings from the other side. We hope you’re all fantastic. Majority of us have one paper left, but some others are done and dusted (isn’t that amazing?). Because of the rigorous nature of preparations towards the mid semester exams, we haven’t been able to meet as a unit and plan further towards our project. However, we know that during the mid-semester break, all outstanding plans will be finalized and we’ll move forward in our design process.

In class this week, we’ll be discussing a book called Poor Economics. It’s a book written by the wife/husband duo Esther Duflo and Abhijit Banerjee. They were both recipients of the Nobel Memorial Prize in Economic Sciences, an amazing feat. Our lecturers, Heather and Rose, assigned our group to Chapter 9 of the book, affectionately titled Reluctant Entrepreneurs. The chapter is organized into several sections that we’ll (try to) summarize below.

Reluctant Entrepreneurs

The first, and perhaps most striking, aspect you notice from the chapter is the fact that true entrepreneurship entails using your cleverness to create something out of nothing. Upon reading this chapter, we understood that not every entrepreneur comes from a wealthy or privileged society. Due to the “hustler” nature of most rural communities, the people who live there have learned to slug it out and make the most of their circumstances.

Another observation made in the book is that sometimes, even with a solution that seems as though it is the best option for a community, the members of that community are fine just the way they are. One way we understood this is that the members of the community were doing just fine before we arrived, and they’ll continue to do just fine after we leave. That’s not to say that we should not be interested in making their situation better. It just means that we should be willing to ideate several times until we reach a solution that they are interested in, not just one that we think is important for them. One major lesson we’ve taken from this aspect of the chapter is that it’s very important to keep going out to the field and understand the solution through the eyes of those who are actually trying it out.

We leave you with a summary of observations made in this section. First, it is likely that the poor are quite likely to find opportunities since they are rarely listened to and their ideas might be fresher. Next, everyone has a shot at being a successful entrepreneur.

Capitalists Without Capital

How do people take advantage of unusual opportunities to make a fortune? Let’s explore some case studies below.

  1. Andhra Pradesh: She started off as a “lowly” trash collector and ended up at the helm of a large network of trash collectors, due in part to a loan she took.
  2. Xu Aihua: She went to a fashion design school and came back to her village to teach local girls how to sew. By 1991, she had saved $27, 600 to buy sixty automatic sewing machines. By 2008, she made a real-estate investment of $4.4 million.

A key indicator of the entrepreneurial spirit among the poor is that even though they are more likely to be severely affected by adverse risks, they’re still willing to go ahead just to try and make something of themselves. Somehow, even after paying crippling interest rates, they still manage to make enough money to repay their loans. This feat in itself is impressive.

Final thoughts from the section: Given the right kind of help, even those who are hit by extreme hardship are capable of turning their lives around.

Chapter 3, Page 1

Week number: 6

Aloha!

Guess what time of the semester it is? For those who guessed ‘exam szn’, you guessed correctly. Next week, all six of us begin our mid semester examinations (and then the week after, we have a break from school — finally). This week, we accomplished two major milestones — we completed Phase 1 of the CCB Design Workbook, and we finally have a fair idea of the tutorials we want to design for our stakeholder, Project Tontro.

During this week, we visited a basic school in Berekuso, the town closest to Ashesi, where we learned about how children study and what makes them excited. As expected, they preferred pictures over text (don’t we all). Our beloved team members, Barnabas and Issifu, decided to embark on this journey, and some of the pictures can be found below.

We also had a first-hand look at some of the tutorials that have already been designed by Project Tontro, with the most notable one being a project called Roll-E, an up cycled e-waste robot. Before we delve deeper into how this tutorial is structured, and what exactly Benedict expects from us, please watch this short video about a day in the life of WALL·E, the inspiration behind Roll-E.


Now that we’re back, we’d like to point out some key aspects of the Roll-E tutorial that we have to follow, in order to make sure that our created tutorials are up to scratch.

  • It is very necessary to make sure that we have lots of pictures and diagrams in our tutorials. Pictures not only make the work look pretty but they also prevent the tutorial from being monotone, drab, and boring. In addition, pictures make it easier for people to follow, especially children who might have limited reading skills.
  • We need to make sure that those following our tutorials at least have access to all of the parts mentioned (or at least substitutes). The point is to be able to build a robot out of everyday items, as well as key electronics components. Some materials we came up with were plastic bottles, key holders, chains from bicycles, etc.
  • One of the key things we have to ensure is that we have a schematic diagram of our project that details exactly how the various components are connected. It makes it easier for us to spot if a mistake has been made.
  • The final key aspect is that we need to write code that is well-commented and easy to understand, as well as provide links to various coding websites if those following the tutorials would like to learn further.

Next week, we’ll be reading a chapter from Poor Economics, and we’ll share that (and other updates) with you in our next post(s).

Until next time!

Chapter 2, Page 1

Week number: 5

Hi again, dear readers!

How’s your week been so far? Ours has been filled with assignments, quizzes, and the like, but we’re still managing. Hopefully you’re all having fantastic weeks.

We just wanted to explicitly clarify what exactly it is that we’re working on. The point of our project is to design projects (using robotics) that teach grade school children the fundamentals of robotics and allow them to build their own projects.

Two weeks ago in class, which was February 6th, we were asked to begin the actions of Phase 1 in the CCB Workbook. For those of us who don’t what what this is, let’s go on a quick commercial break while we insert below a brief summary of the entire CCB process.


Some facts about the CCB Workbook

  • CCB = Creative Capacity Building
  • Outlines the various steps needed to follow the design approach used at MIT’s D-Lab [fun fact: one of our lecturers, Dr. Heather Beem, is a proud MIT alum]
  • Assures us of the fact that we will come up with better solutions and better products by the time we’re done using it
  • The workbook PDF can be found by clicking on the word here!

Now that we’re back, we hope you at least have a fair idea of what the CCB Design Workbook is. As we were saying earlier, we were tasked with beginning (and completing) Phase 1. For those of you who actually followed the link and went to the PDF (bless your hearts), you would have noticed that Phase 1 is titled Information. Essentially, this phase is to help us find out as much information as possible before we just start designing. Not gathering information before we start building is akin to building a house without a building or architectural plan — there’s going to be a lot of confusion.

As we started this phase, we spoke with Benedict and tried to get as much information as we could. We also looked at things that are similar and exist already, in order to find out what we could do to make our solution unique. While we don’t want to give away too much information, we would also like you to know some of the key things that we found out, as well as a couple of challenges we encountered along the way.

Challenges

  • One major challenge is that our solution isn’t a product in the strictest sense. It’s more of a tutorial than a tangible product, even though we will be building projects and writing tutorials about them. However, we spoke to our other lecturer, Rose Dodd, and she provided us with invaluable advice!
  • Another challenge is finding time when we’re all free to meet. However, since we’re all engineering students, we’re just looking for common free times in our schedules so that we can do this project to the best of our ability.

Key Things

  • Related technologies include, but are not limited to,
    • AWS DeepRacer (note: while this is not strictly geared towards grade school children, it’s still a way to teach people how to program and build their own projects)
    • Modular Robotics (note: they make robotics kits for children, our target market)
    • Wizbots (note: this is a robotics-based design lab for children between the ages of 7 and 14, with summer camp & after-school programs)
  • What can we draw inspiration from?
    • AWS DeepRacer, in that we can think of ways to simulate the building process for our users
    • LEGO Mindstorms, especially since their tutorials and guides are simple and easy to follow
  • Some questions we have
    • How exactly do children in our target group learn? What are their attention spans? Why would they choose our tutorials over watching cartoons or playing video games?
    • What is the best way to design a tutorial for building robotics projects? Should we use cartoons? Should it be a comic book vibe? How exactly would we have simple and easy-to-understand English?

We hope you’ve learned something new, and that you have a fair idea of our journey. Please feel free to leave comments with suggestions, ideas, etc.

Signing out,

Chapter 1, Page 1: An Intro

Week Number: 4

Hi, there! Welcome to our blog. It is through this that we will give you sneak peeks into our lives as third year engineering students that have been tasked with a project aiming to make the lives of local community members better. Being engineering students at Ashesi isn’t easy at all, but we’re excited to show you how we’ll balance all of that with this project. Take a step into our journal and let’s begin.

As this is our first post, it’ll be more introductory that anything else. There are 6 of us in the group, 4 of us being computer engineering students, and 2 of us being electrical and electronics engineering students.

Relevant statistics

  • Male to female ratio = 5 : 1
  • CE to EE to ME ratio = 2 : 1 : 0
  • Interest in robotics and building cool projects = 100%

One of the advantages of our project in particular is that an alumnus of Ashesi, Benedict Quartey, started something similar at his basic school. The link to his existing project, Project Tontro, can be found here, an article on Ashesi’s website that details what exactly he started working on. One of the key aspects of the Project Tontro curriculum is the incorporation of design thinking and creative problem solving. As Ashesi students, we’ve all done Foundations of Design and Entrepreneurship (FDE), which was our introduction to design thinking. Combining this with our respective knowledge in engineering means that this is a project that essentially serves as a capstone of what we’ve learned at Ashesi.

We’re looking forward to sharing our journey with you. Until we meet next time!

Design a site like this with WordPress.com
Get started